In my carousing of multiple (ok a ton) of blogs, I've been inspired to make my hunny a fun St. Patty's Day meal. I want to go all out, but have had a few things holding me back.
1. The last time I "went all out", I was planning on feeding about 8 grown men. Lucky for me, they all had last minute plans and it ended up being just Jonny and me. LAME!
2. My inner child tends to come out to play whenever I get myself into these moods. To me it's not a bad thing necessarily, but for any other rationally-thinking adult it might be a bit much. I love to make green foods and decorate all festive around the dining area. Jon thinks it's "unnecessary"....well hunny, I do it for you so ENJOY! xoxox
For my dinner menu, I'm thinking something along the lines of the following:
Irish Aebleskivers
I love Aebleskivers. My Dad grew up loving to make them and only recently got back in touch with those "roots" by finding his mom's (my grandmother's) Aebleskiver pan. It's so exciting! These remind me of him so they're going on my list!
Irish Aebleskiver
(adapted from a collection of recipes in Rosemalers’ Recipes, 1987.)
- 1 cup sugar
- 2 eggs, beaten
- 1/2 cup butter, melted
- 2 cups all-purpose flour
- 2 1/2 teaspoons baking powder
- 1/2 teaspoon salt
- 1/2 cup milk
- 1/2 cup beer
- sauerkraut, drained and chopped
- corned beef, chopped fine
- swiss cheese, grated
- 1/4 c chopped onion (opt)
*Thousand Island dressing or some Russian dressing to dip
Combine sugar and eggs and beat well with whisk. Add cooled butter to mixture and whisk again to blend. Sift dry ingredients and add alternately with milk and beer. Heat aebleskiver pan. When pan is hot, put a teaspoon or so of canola oil in each well. Spoon enough dough into each section to read 3/4 way to the top. Sprinkle each one with cheese, meat and sauerkraut. Cook and turn with a chopstick when golden brown on the bottom. When aebleskiver is golden all the way around, remove from pan. Try to let it cool a minute or two before eating. The cheese inside gets pretty hot. Makes 3 to 4 dozen (Depending on the size of the wells in your aebleskiver pan.)
Next I think I'll make Colcannon. This is said to have been the staple for most Irish since the beginning.
Colcannon
From Recipe4Living
- 6 medium potatoes; peeled and quartered
- 4 c cabbage; shredded
- 1 c green onions; chopped
- 1/4 c butter
- 1/2 - 3/4 c milk
- 1 Tbs parsley; snipped
- Salt and Pepper; to taste
Cook the potatoes in salted water until tender; drain them. Meanwhile, cook the cabbage for about 15 mins and drain. Simmer the chopped onions in milk for about 10 mins. Mash the potatoes with an electric mixer(or whatever you've got), and slowly beat in the butter and as much milk as needed to make them fluffy and creamy. Add salt and pepper, then stir in the cabbage. Top it off with the snipped parsley. Serve with additional butter or gravy.
***I think this might even be good with sauteed apples and sauerkraut, and even some chopped bacon!
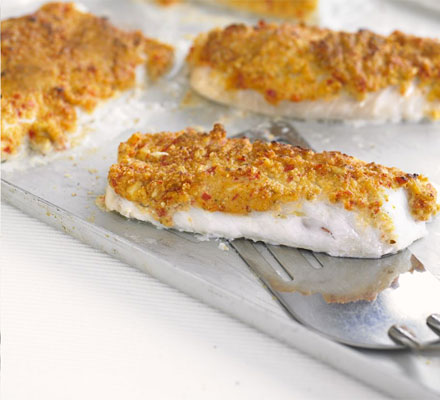
For the main course, I'm thinking Fish. We'll have a lot of starchiness with the other 2 dishes and this will balance it out nicely.
Irish Crusted Fish
From Helen Brummer - Recipe4Living
- 4 fish fillets; Tilapia might be good
- 1/2 c breadcrumbs; unseasoned
- 2 Tbs butter or margarine; melted
- 2 Tbs fresh parsley
- 2 tsp spicy brown mustard
- 2 tsp spring onions; minced
- 6oz cheddar cheese; shredded
- 1 c heavy cream
Preheat your oven to 375. Butter or spray a casserole dish and place fish in it. In a bowl, mix the breadcrumbs, butter, parsley, mustard, and onions. Add the cheese and mix well. Place this mixture on the fish, making a crust, and pat it down. Pour the cream over all and bake until the fish flakes and the top is bubbly brown.
**If your fish is flaking but the top isn't brown yet, just pull out of the oven and turn on your broiler. Wait until it's up to temp and pop the fish back in. Keep an eye on it so it doesn't burn. Voila!
For one more side dish, I'm thinking Brussels Sprouts. They're just so yummy!!(with vinegar of course)
Braised Brussels Sprouts
From Me!
- 1 pkg frozen Brussels sprouts
- 1/2 c butter
- 3-4 rashers bacon
- 1 tsp + 1/2 tsp salt
- Black pepper; to taste
- 2-3 Tbs cider vinegar, plus more to taste
- 1/4 c onion; diced
Fill a saucepan 1/2 way with water, put in 1 tsp salt and empty pkg of sprouts into it. Bring water to a boil and cook for about 8 mins. Drain and halve; set aside.
In a skillet, cook bacon until crisp. Drain
most of the fat from the pan, but leave about 2 tsp in the bottom. Add the onion and cook until soft. Add in the halved sprouts and mix well. Add the 1/2 c butter, 1/2 tsp salt, pepper, and vinegar. Serve immediately.
Last but certainly not least, the dessert of all desserts. Irish Trifle Parfaits!!! Oh my goodness, I am probably the most die-hard Irish Creme fanatic you've ever met. I've loved it since my first taste of Stephen's Hot Chocolate in that flavor....basically my friends, a match made in Heaven!!!
Irish Trifle Parfaits
- 1 (4 oz) pkg of Instant Vanilla Pudding + 3-4 drops of green food color
- 1 (4 oz) pkg of Instant Chocolate Pudding
- 10 mini chocolate cupcakes or 1 chocolate cake, baked
- 1 bottle Irish Cream Coffee Creamer
- 1 bag of Andes Mint Chips (in the baking aisle)
- 1 tub of Whipped Topping
Begin by baking mini chocolate cupcakes or 1 large chocolate cake. After they are baked and cooled, place them on a cookie sheet and poke them with a fork. Pour a small amount of the Irish Creamer over them. Place them in the fridge to chill, about 30 minutes. While the cupcakes/cake are in the fridge, mix the puddings. I just added a few drops of green food color to the Vanilla Pudding. Mix the chocolate as directed on the box.
To Assemble:
Place about 2 teaspoons of Vanilla/Green Pudding in bottom of tall dessert glass. Next, cut the cupcakes into small pieces and add on top. The next layer is about 2 teaspoons of chocolate pudding, then add 2 teaspoons of whipped topping and a sprinkle of the Andes Mint Chips. Repeat the layers, then on top put a dollop of whipped topping and a sprinkle of Andes Mints for decoration.
Place in fridge to chill and set, at least 30 minutes.
Well, wish me luck(luck of the Irish, that is) because I'm gonna be a cooking fiend tomorrow! Decked out in green of course!


